
If you’ve ever queued up a “quick call” only to realize it’s 10:45 PM for the customer… hi, we’re friends. In this post we’ll build a tiny-but-mighty integration that shows a customer’s local time on the record and teaches Agentforce to respect quiet hours. No middleware, no drama—just External Services + Flow + a small Agent action.
The use case (meet Maya)
Maya is a Tier-2 support agent in Denver with a global queue. Her job is first-contact resolution and CSAT. Her pain? Calling during the customer’s off-hours, leaving voicemails, and losing momentum.
What we want:
- Show the local time + time zone on Account/Contact – after its on Account, you can reference this on any related record too!
- If it’s outside 8:00–5:00 local, gently deflect and propose better windows.
- Let Agentforce use the same signal automatically when scheduling calls or messages.
What we’re building
- External Service: IPGeolocation Time Zone API
- Flow (Record-Triggered): Enrich Account with local time text
- Flow (Autolaunched): Agent-invokable “CheckLocalTime”
- Agentforce: Action + prompt rule to honor quiet hours
Prereqs (2 minutes)
- A Salesforce Developer Edition org
- Ability to create Named/External Credentials and Flows
- (Optional) Your own Agentforce-enabled org for the last step
Step 1: Get a Time Zone API key (1 minute)
- Sign up at ipgeolocation.io (free dev plan).
- Copy your API key from the dashboard.
- We’ll pass it as a query parameter.
Step 2: Create two tiny fields (Account)
- Local_Time__c → Text (255)
Example value:2:37 PM - Local_Time_Zone__c (optional) → Text (100)
Example value:America/Phoenix

(You can repeat on Contact (or more!) later—start with Account to keep it simple.)
Step 3: External Credential (runtime access)
- Setup → External Credentials → New (this is actually nested under Named Credentials)
- Label:
Time Zone - Authentication Protocol: No Authentication
- Save.
- Label:
- On the External Credential, add a Principal (Named Principal is fine).
Step 4: Create or Add to a Permission Set
- In your permission set, find the settings for External Credential Principal Access
- Add the Principal access you created and Save.
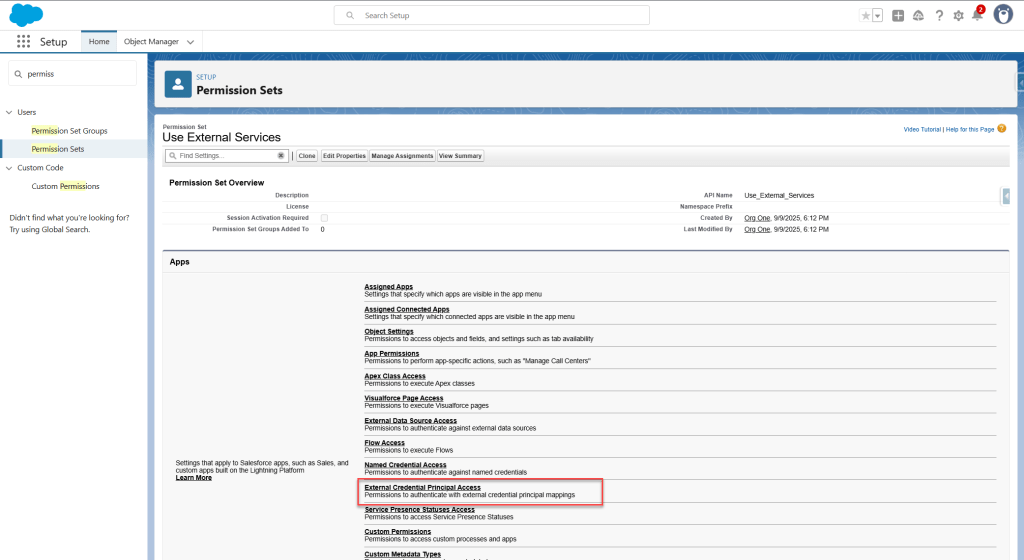
Assign that Permission Set to your user. Don’t skip this—otherwise runtime callouts will fail even if setup looks perfect.
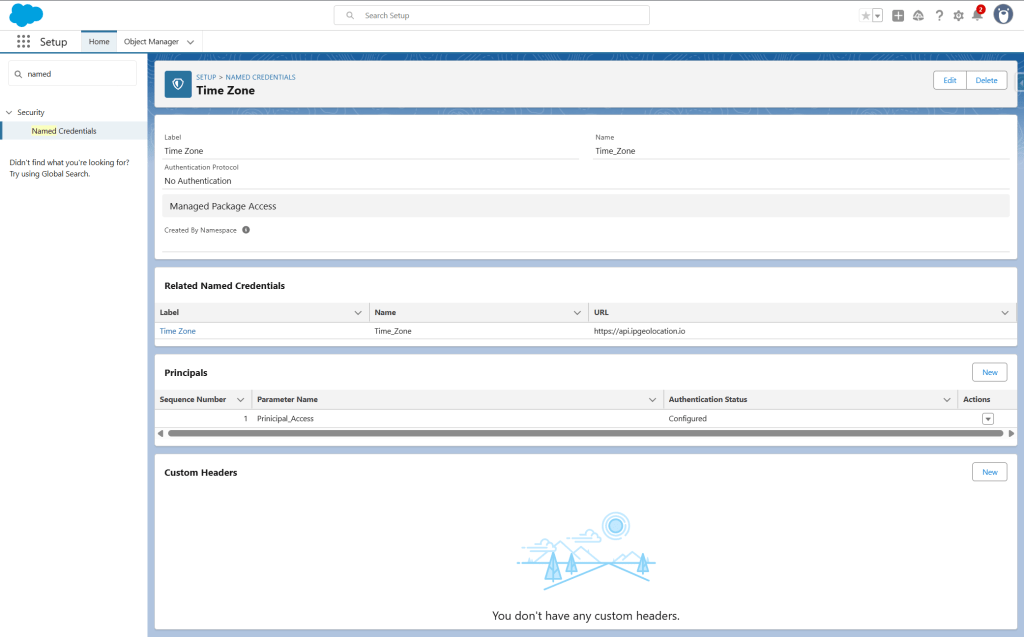
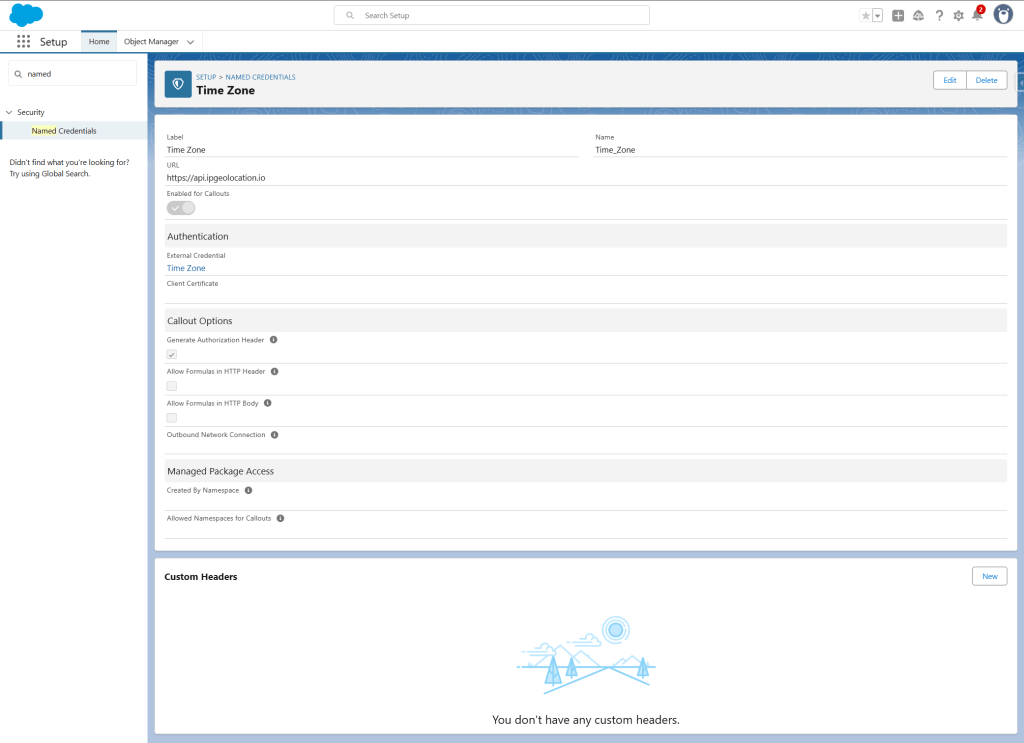
Step 5: Named Credential
- Setup → Named Credentials → New
- Label/Name:
Time Zone - URL:
https://api.ipgeolocation.io - External Credential: select
Time Zone - Save.
- Label/Name:
Step 6: Register the External Service
- Navigate to External Services > Add an External Service > From API Specification
- Enter a name and description
- For Service Schema, select Complete Schema
- For Named Credential, select the one we created in the previous step
For the schema, you can create your own from the documentation on the api website, or you can use this slimmed down one that I used:
{
  "openapi": "3.0.3",
  "info": {
    "title": "IPGeolocation Time Zone API (Location \u2192 Time Zone)",
    "version": "2.0.0",
    "description": "Matches official response structure: top-level 'location' and 'time_zone' objects."
  },
  "servers": [{
    "url": "https://api.ipgeolocation.io"
  }],
  "paths": {
    "/v2/timezone": {
      "get": {
        "summary": "Get time zone info from address/city",
        "operationId": "getTimezoneByLocation",
        "parameters": [{
            "name": "apiKey",
            "in": "query",
            "required": true,
            "schema": {
              "type": "string"
            },
            "description": "Your ipgeolocation.io API key"
          },
          {
            "name": "location",
            "in": "query",
            "required": true,
            "schema": {
              "type": "string"
            },
            "description": "City/address, e.g., 'Phoenix, AZ' or 'London, UK'"
          }
        ],
        "responses": {
          "200": {
            "description": "OK",
            "content": {
              "application/json": {
                "schema": {
                  "type": "object",
                  "properties": {
                    "location": {
                      "type": "object",
                      "properties": {
                        "location_string": {
                          "type": "string"
                        },
                        "country_name": {
                          "type": "string"
                        },
                        "state_prov": {
                          "type": "string"
                        },
                        "city": {
                          "type": "string"
                        },
                        "locality": {
                          "type": "string"
                        },
                        "latitude": {
                          "type": "string"
                        },
                        "longitude": {
                          "type": "string"
                        }
                      }
                    },
                    "time_zone": {
                      "type": "object",
                      "properties": {
                        "name": {
                          "type": "string"
                        },
                        "offset": {
                          "type": "number"
                        },
                        "offset_with_dst": {
                          "type": "number"
                        },
                        "date": {
                          "type": "string"
                        },
                        "date_time": {
                          "type": "string"
                        },
                        "date_time_txt": {
                          "type": "string"
                        },
                        "date_time_wti": {
                          "type": "string"
                        },
                        "date_time_ymd": {
                          "type": "string"
                        },
                        "date_time_unix": {
                          "type": "number"
                        },
                        "time_24": {
                          "type": "string"
                        },
                        "time_12": {
                          "type": "string"
                        },
                        "week": {
                          "type": "integer"
                        },
                        "month": {
                          "type": "integer"
                        },
                        "year": {
                          "type": "integer"
                        },
                        "year_abbr": {
                          "type": "string"
                        },
                        "is_dst": {
                          "type": "boolean"
                        },
                        "dst_savings": {
                          "type": "number"
                        },
                        "dst_exists": {
                          "type": "boolean"
                        }
                      }
                    }
                  }
                }
              }
            }
          }
        }
      }
    }
  }
}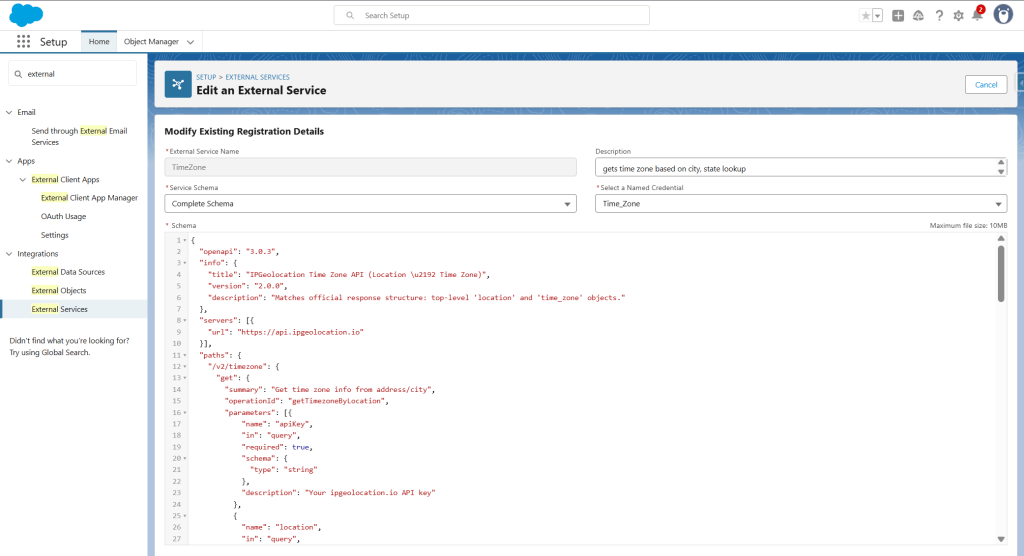
Now we’ll select the operation we want to be able to use (we only added one in our schema). Click Next.
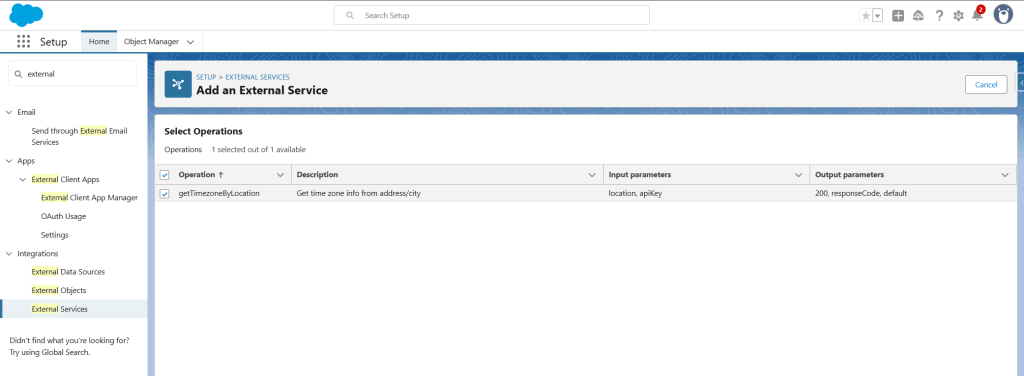
Click finish and you’ve just completed our integration! Now we need to set a flow to actually use the service.
Step 7: Create a Flow
We’re actually going to create 2 flows – a record triggered flow that will update our account whenever the shipping city/state are changed, and an auto-launched (no trigger) flow that is needed for the Agentforce piece. If you don’t care about the Agentforce part and only want this super simple Time Zone integration, then you can just do it all in a record triggered flow.
For a use case like displaying the current time on a case when it is loaded, I would suggest building out a screen flow that can be added to the case’s lightning record page – that way the flow will run on load and refresh and always be displayed on the page for your agents. If you go that route, same basic steps in the flow, just a different flow type.
First we’re going to create the auto-launched flow that the agent will need. This way we can keep all of our external service logic in this one sub-flow vs adding it multiple times in various flows. So, start by creating a new Auto-Launched (No Trigger) flow. This is the only type of flow an agent can access (for now).
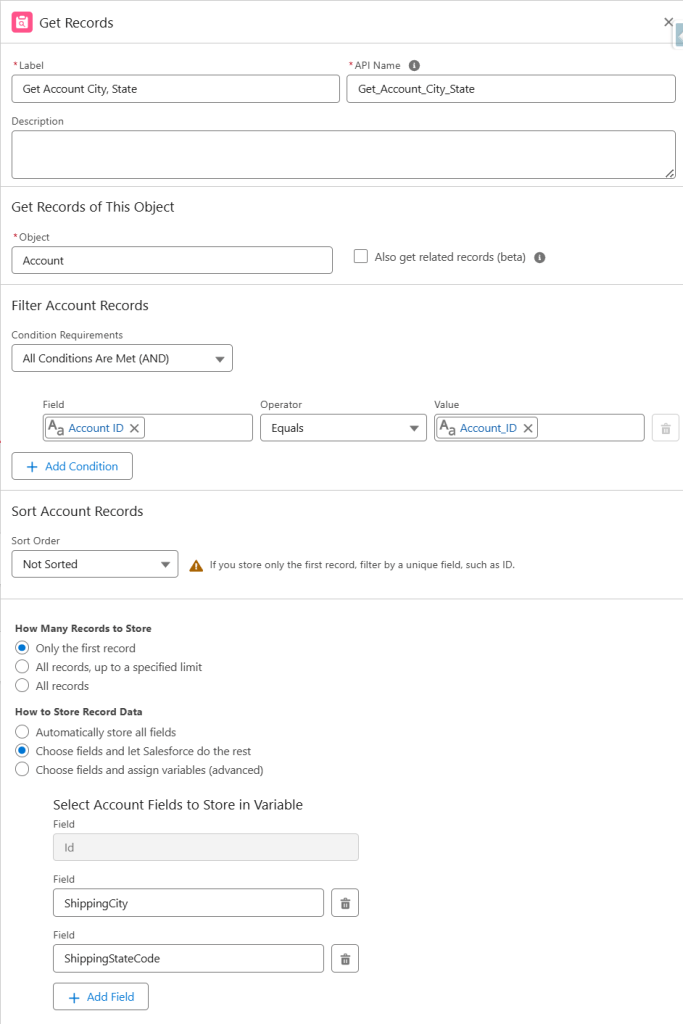
Now that we have our flow canvas, the first thing we’re going to do is create a new variable called Account_ID. This isn’t a variable name that I’d normally use, but since this is potentially being used by an Agent, we have to remember that agents look at variable names and descriptions as part of their instructions – so name things clearly and logically. No easter eggs! We also want to make sure we check this for Available for input.

Next we’re going to add a Get Records element. Instead of creating the ID as a record variable, we did text because of this next step. I don’t want to give my agent access to EVERYTHING, so instead I’ll have it lookup the account and just set 2 fields: ShippingCity and ShippingStateCode.
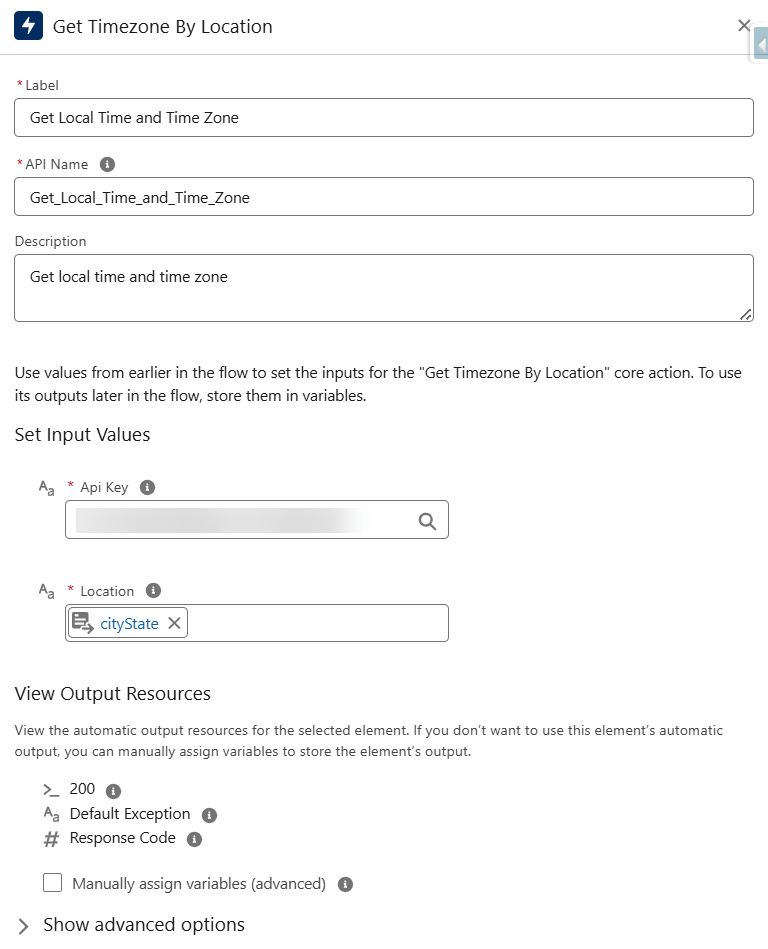
Looking good! Now comes the fun – we’re going to add an action element that uses our External Service that we created! Search for the name of your External Service – if you did the same as me, it’ll be called Time Zone.
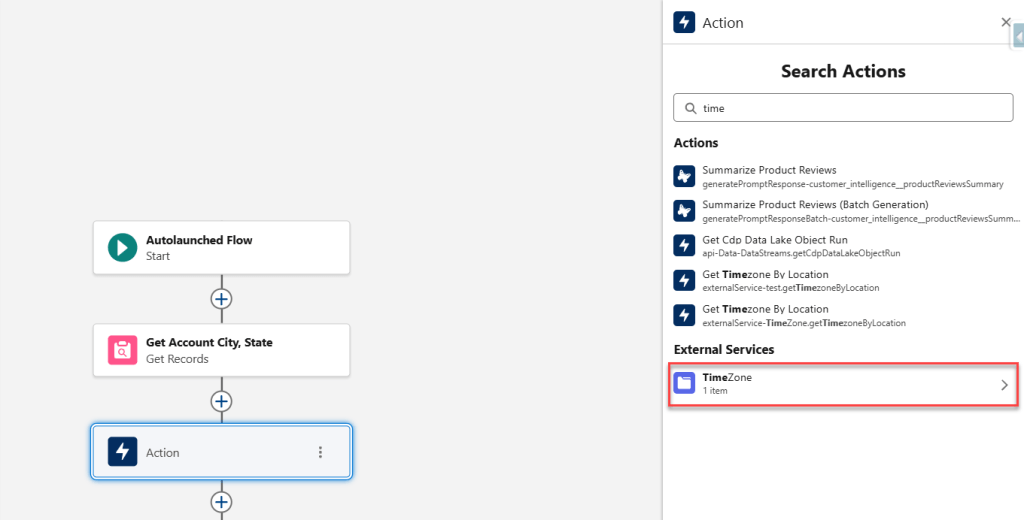
External Services show up in their own section in the actions menu. Click the External Service you want to add and then it will also prompt you to select the operation you want to use. In our case, there’s only one, so choose that one.
You’ll see that we have 2 input values to set. These are coming straight from our API specification that we added! The first will be your API Key – you’ll copy and paste this from your API dashboard from step 1.
SPECIAL NOTE: I’m just copying and pasting it here to play around. It is NOT best practice to actually have your API Key stored in your flow. If you are setting this up for reals, I recommend creating a Custom Metadata Type and storing it there and then adding an additional Get Records element to get the value and add it as a variable here.
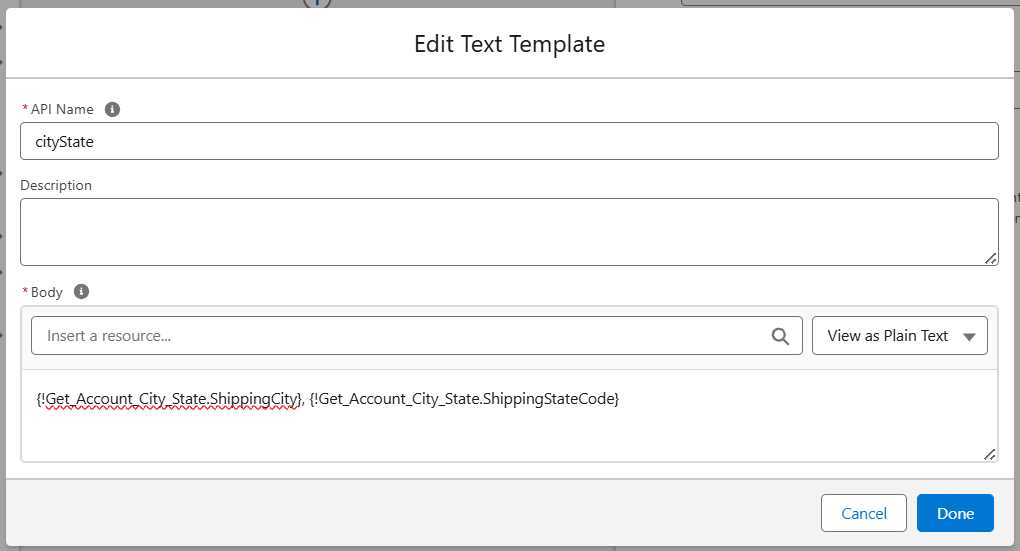
After API Key, we also have Location. If you remember our API Specification, this should be in the format of “City, State”. I created a text template for this, but you could also use a formula. We’ll use the record variable that was created in our first Get Records element.
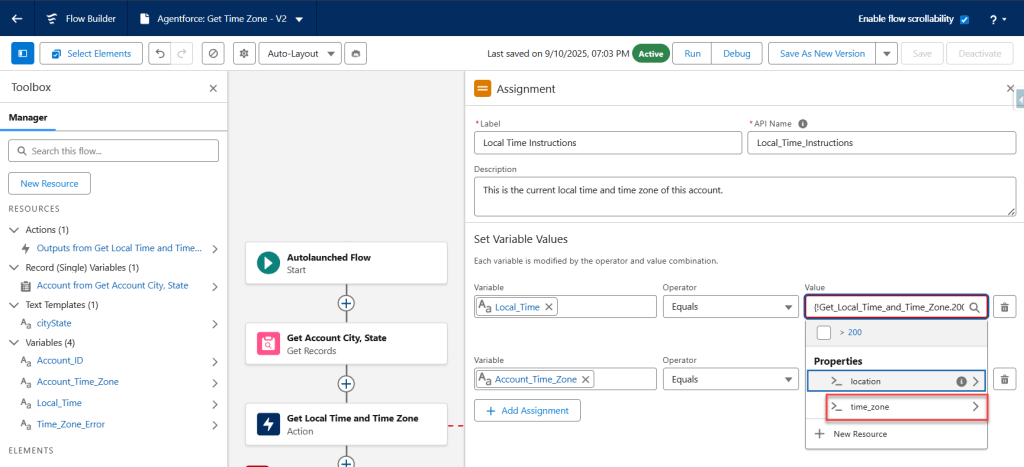
So our External Service action should look like this:
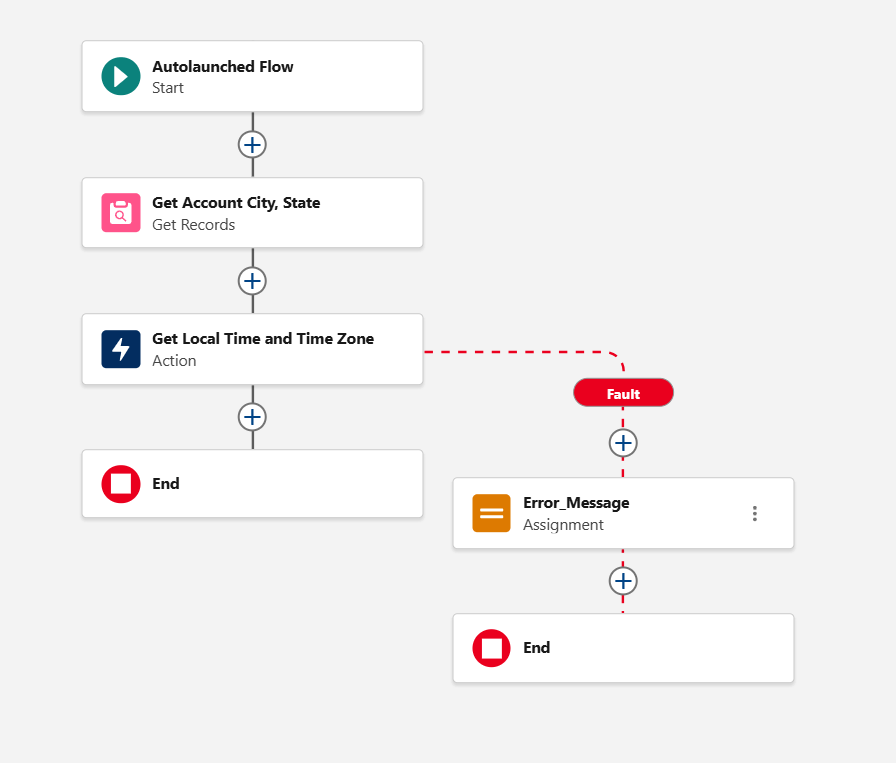
Now, since we are doing a callout and there could be errors that happen, we want to make sure we handle them. Add a fault path from our External Service action and we’re going to assign a new variable that will store an error message that the agent can use downstream.
Here is our assignment:
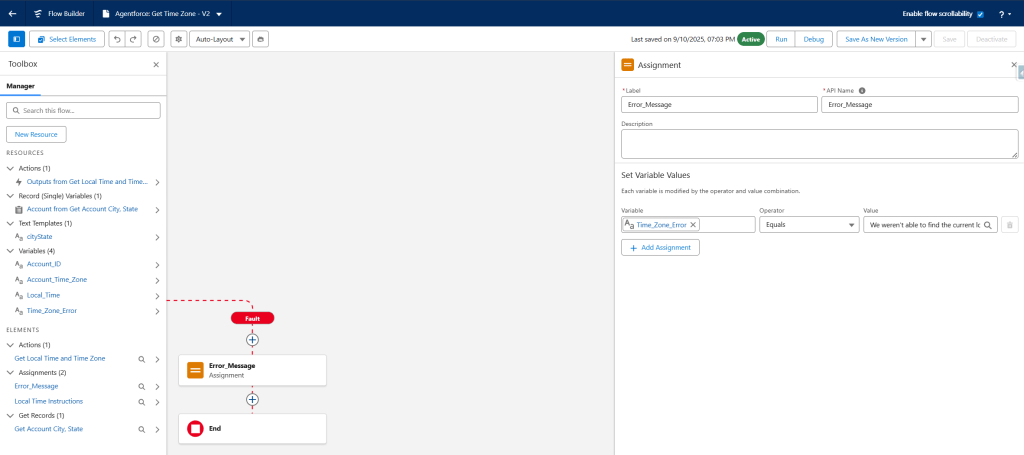
And the variable we’re creating for the error message. Remember to make this available for output so our agent can access it! And remember what I said about variable names and descriptions – the agent will read and use it all.
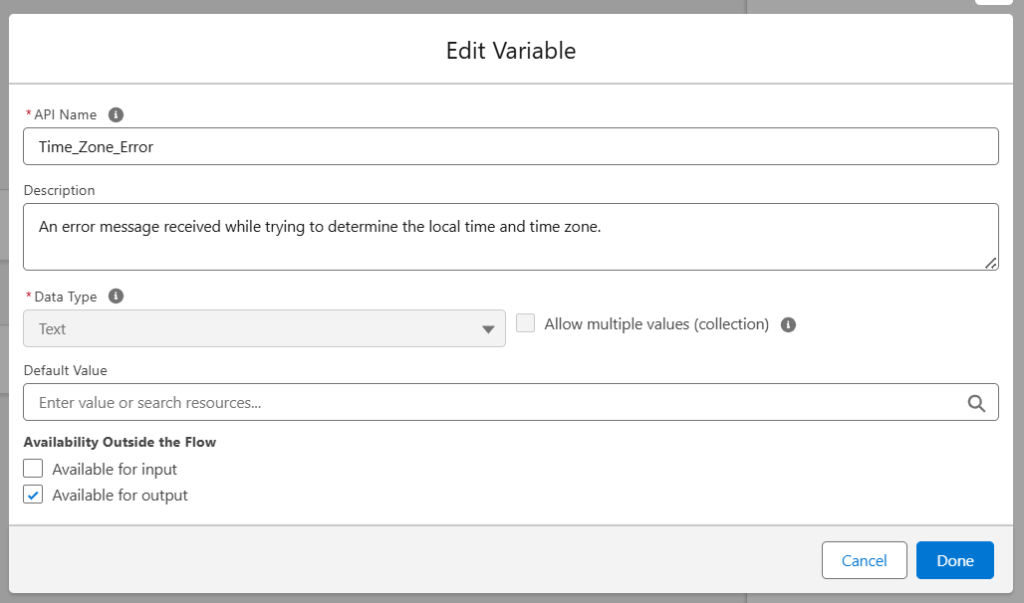
I’m setting the value of this variable to: We weren’t able to find the current local time or time zone for this account.
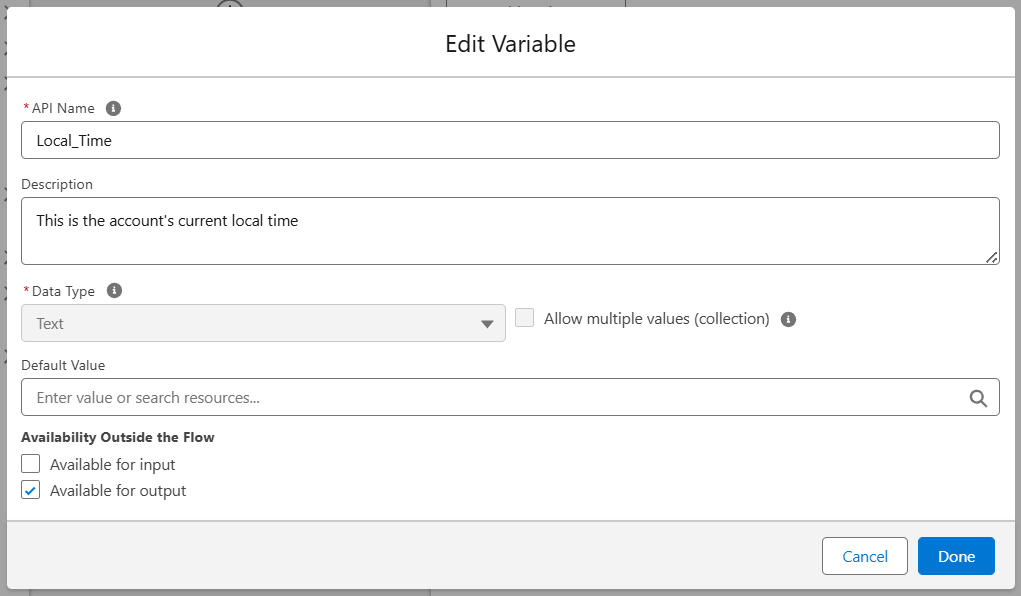
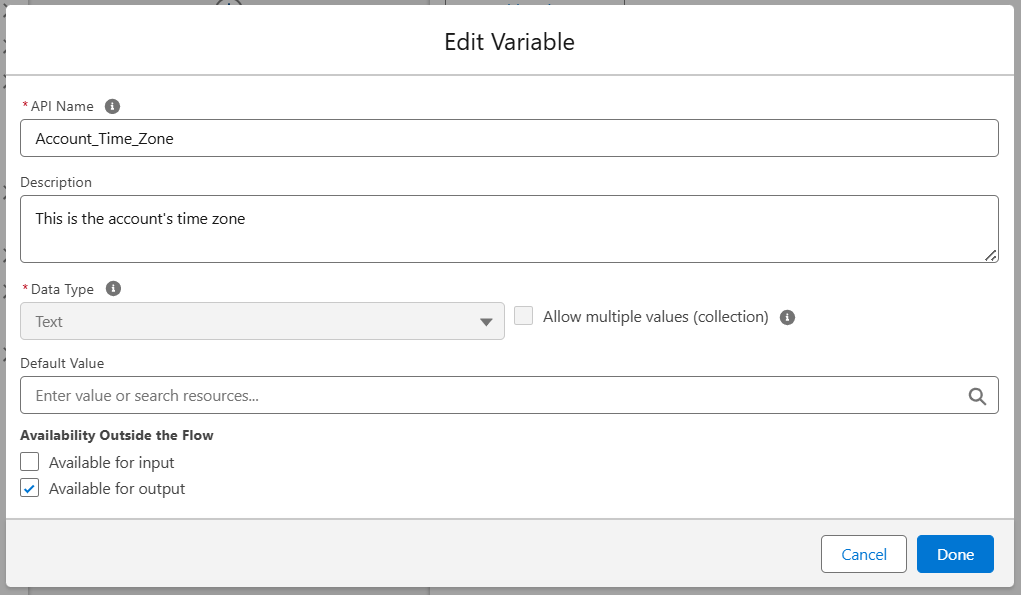
And finally, we’ll create a couple new variables for the local time and time zone that we pull back from our api and set those using another assignment element.
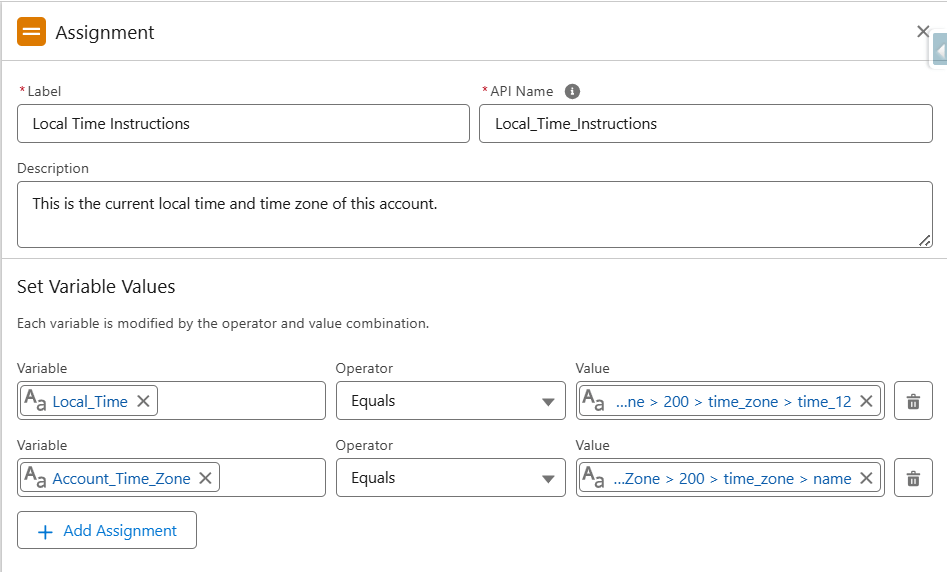
Create 2 new variable and ensure they are set to Available for Output.
The values we’re looking for are behind our Response Code 200, and then time_zone. Take a minute to explore all the great values that we are pulling back from this API though and think through more use cases for them! We’re getting location data like city, state, country, longitude and latitude, and time zone information like name, GMT offset, formatted times in both 12 hour and 24 hour formats, and more. Refer to the api documentation for complete definitions.
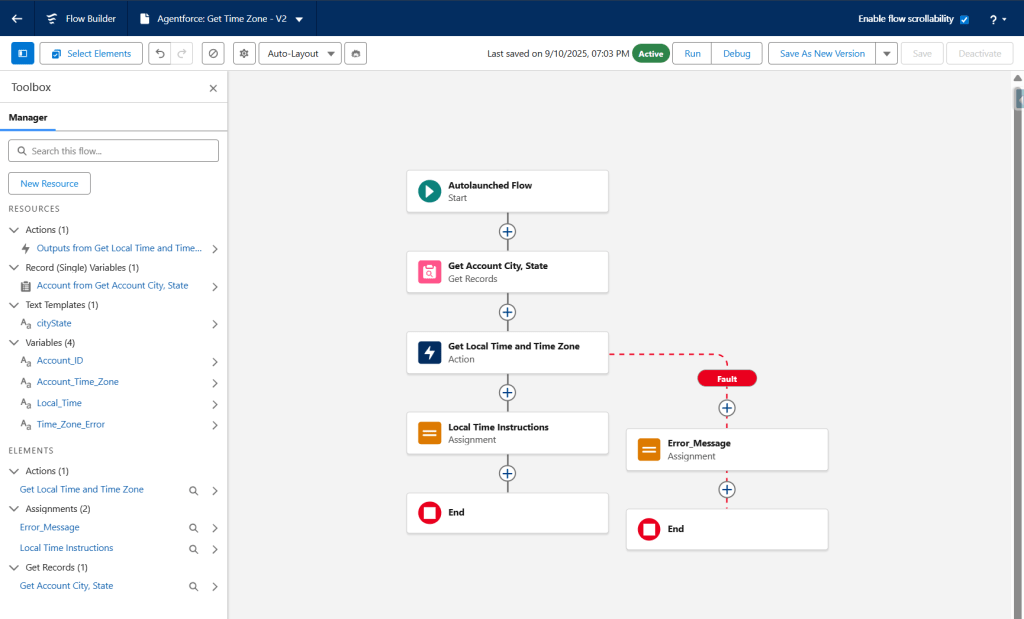
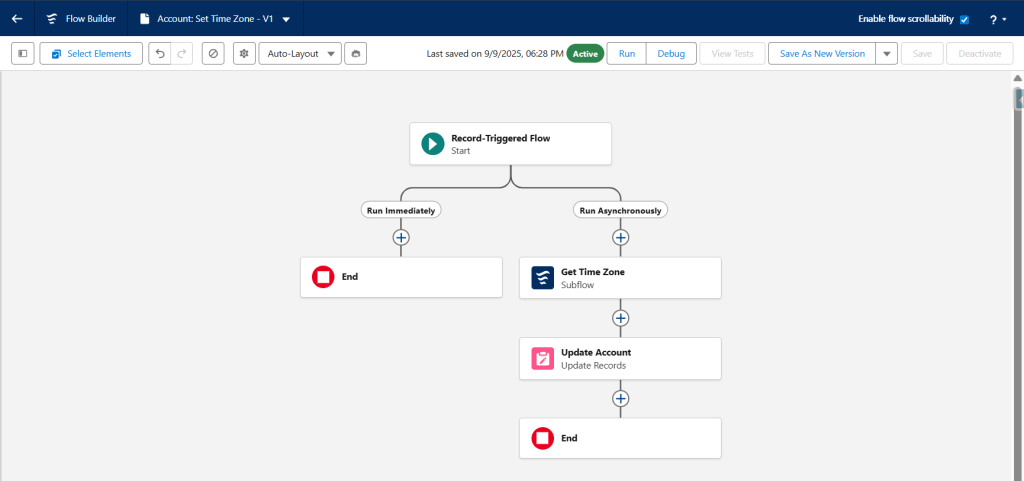
And that’s it! Your complete flow should look something like this:
Now, if you only wanted to use this for Agentforce, you’d be all set, but in my use case, I also want to see this information reflected on my account, so I’m going to create another record-triggered flow that calls this flow and do that.
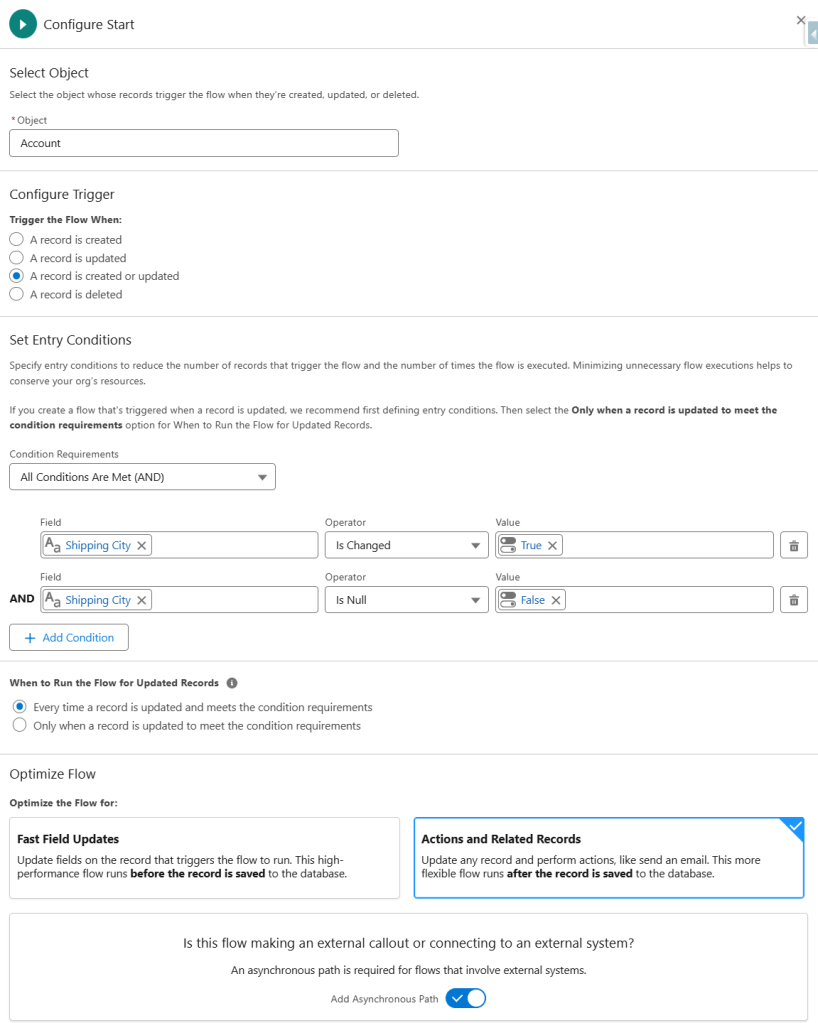
So, create a new Record-Triggered Flow! The object will be Account, and we want to trigger this on Create or Update. We do want to have some entry criteria here because if there is no Shipping City or State, we don’t want to waste a call to our API when we’ll just receive back an error. If you are making this flow just for this – putting this criteria in the start element is fine. If you are adding it to an existing record-triggered account flow, you could just add a decision element instead.
We want to make sure this is set as Actions and Related Records, and we need to toggle the Asynchronous path. You can’t make external calls in an immediate path. Your start element should look like this:
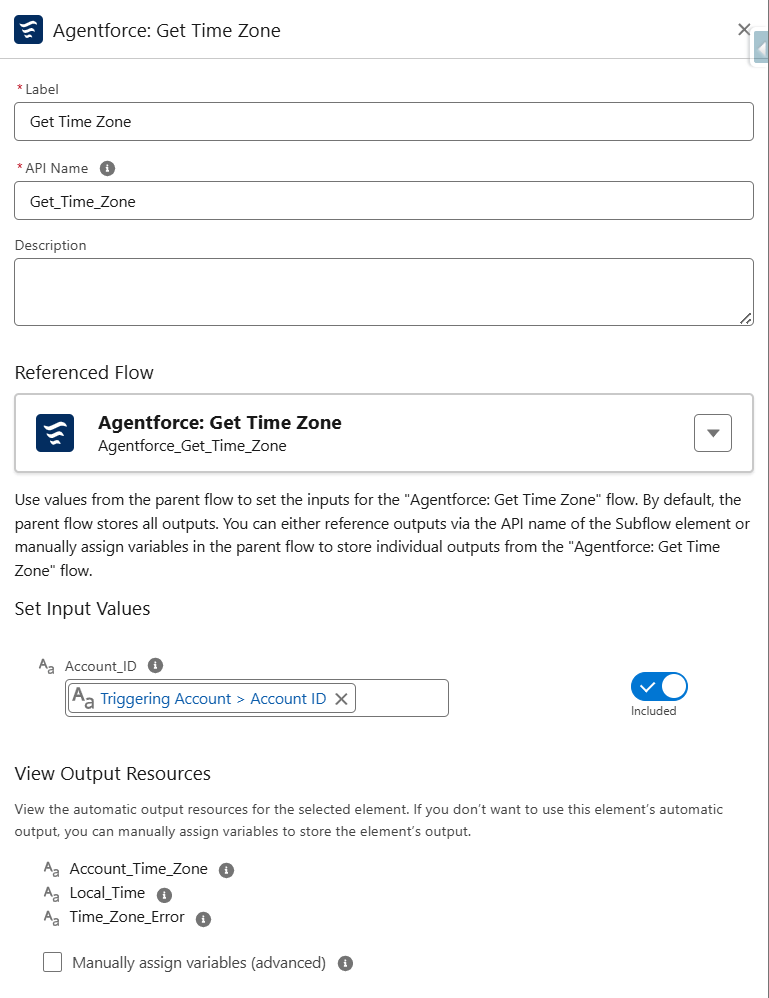
Now, remember we’re working from our asynchronous path, we want to add a subflow element, and call the autolaunched flow we just made in the previous step. If you’ll remember, we need to pass in an Account Id to that flow, so we’ll set the input variable to the Id of the Account that triggered the flow.
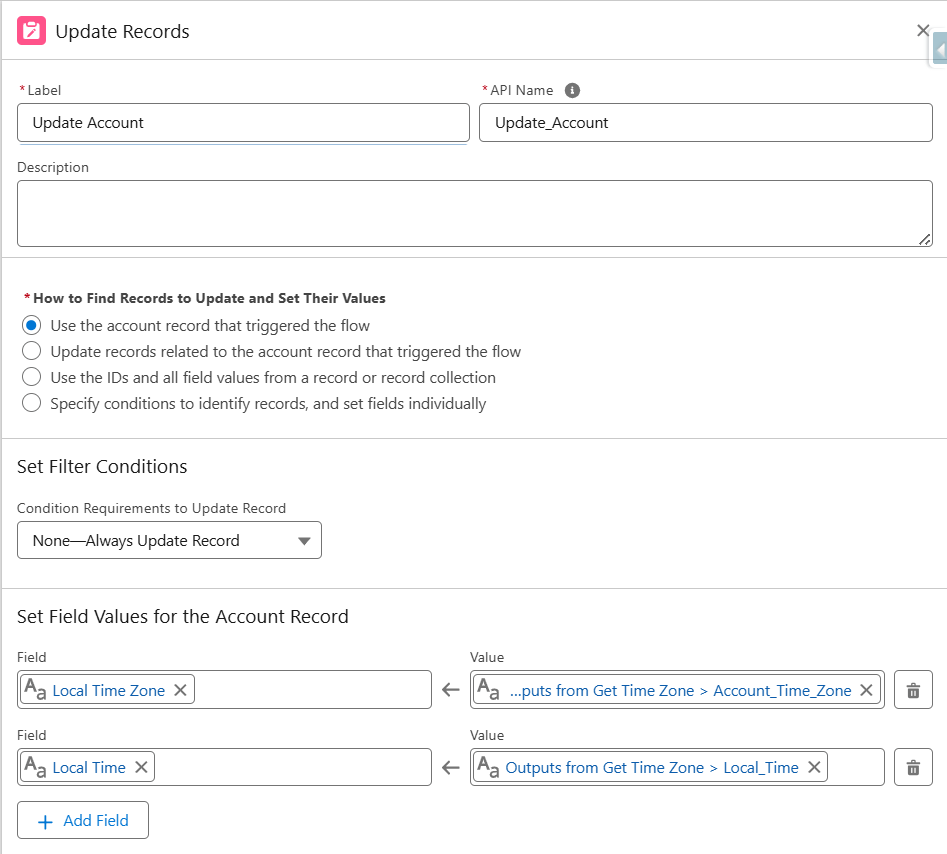
And then we’ll do an Update Records element to update our account, and be done with it! You’ll set the values of the 2 custom fields we created in step 2 to the variables we are getting back from our subflow.
And that’s it! The whole record-triggered flow looks like:
You can debug this now and try changing the shipping city on your account. I had fun changing it to various cities all over the place and returning the local time and time zone.
Of course, storing the local time on an account only when the shipping city changes it silly and I wouldn’t actually do it. Time Zone yes, but TIME, no. That’s where my idea for the screen flow comes in so you can see the actual current time whenever the page loads. But its fun to play with anyway, and gives you all the functionality you need to take this in any direction you want!
So how does our Agent use this?
Step 8: Agentforce action + prompt rule
First we need to create a new action in our Agent. I’m using the default agent and even using an existing General CRM topic. You may have a custom agent you’ve built or want to create a new topic just for this. That’s totally fine – you do you!
Make sure your agent is deactivated, and then either create a new topic or click into the topic you want to add this feature to. Click on the “This Topics Actions” tab, and then create a new action.
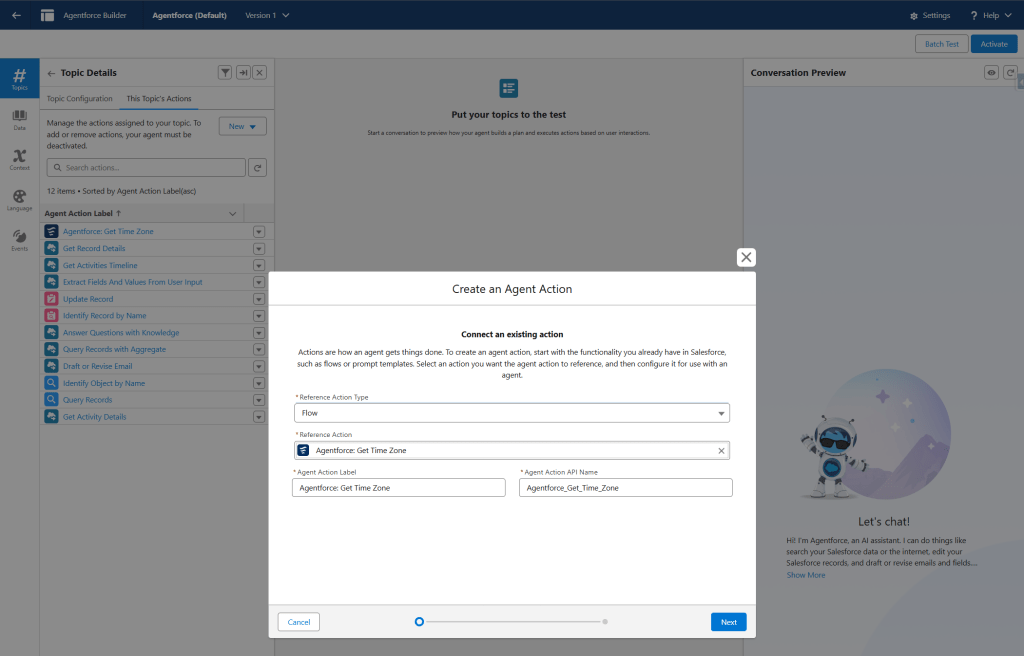
Copy the API name of your action from the bottom right of that screen before you save it.
When you’re done adding your action, go back to the topic configuration, and scroll to the bottom to add a new instruction. This is the instruction I added:
“When planning or proposing any time-bound activity (phone call, email send time, meeting, follow-up task), first call the action
“Agentforce_Get_Time_Zone” with the Account’s Id. Always run Agentforce_Get_Time_Zone before suggesting or scheduling times. Honor business hours of 08:00 AM–6:00 PM in the account’s local time. Format all proposed times in the customer’s local time and include the time zone label, e.g., “10:30 AM America/Chicago””
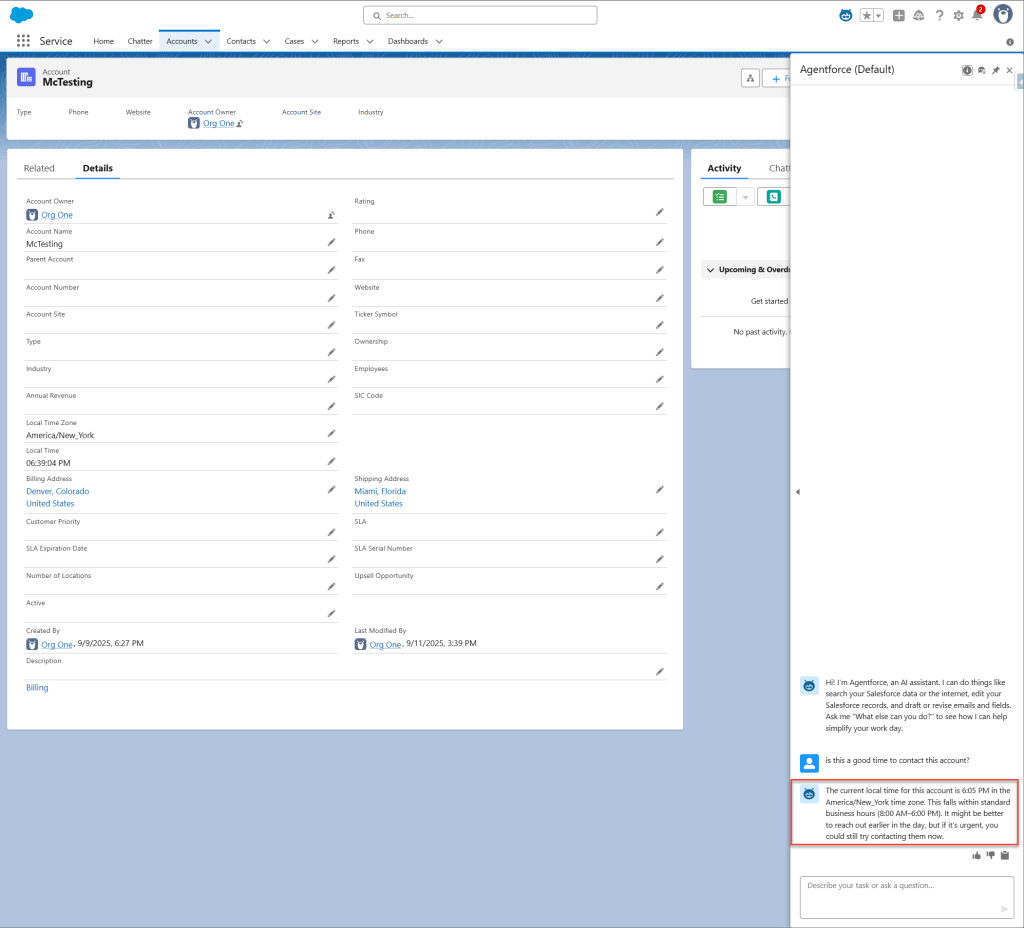
Save and activate your agent. You can also use the conversation preview instead of activating it. Now navigate to an account record and click on the Astro icon at the top of your screen to open Agentforce. I’m going to ask if its a good time to connect with this account, and Agentforce will run our flow and let us know!
Easy as that! Implementation in under an hour with a fully functioning time zone solution that you could use in any number of ways? I call that a win!
Let’s wrap it up
With this simple solution you have
- a way to get the customer’s time zone on a record
- some ideas on how to take it even further
- a way to let your agent use the data
Now, remember this API we set up has tiers, so if you are going to use this for reals, be sure to checkout how many calls you’re allowed to make, etc. I expect a real use case would need a paid tier, especially if you’ll put it to work in an agent.
Happy implementing y’all!

0 comments on “Time-Zone Aware Outreach with External Services, Flow, and Agentforce”